First steps
I’ll assume that you already have git installed on your system. If not then probably the easiest way to achieve this is to download an installer from here.
Once you have Git installed, the next step is to provide it with your name and email address which will be used to sign your commits. This provides us with the ability to see who made what changes when collaborating on a project.
Type the following in a terminal, making the obvious substitutions:
% git config --global user.name "G Lucas"
% git config --global user.email glucas@jabbaspalace.edu.au
Next you need to tell Git what editor you want to use when Git needs you to type something:
% git config --global core.editor vim
You should replace vim with what ever your favorite editor is (e.g. emacs, nano, subl, etc.).
You can also make things a little easier on the eyes by telling Git to add some color to its messages:
% git config --global color.ui true
Now that your all set up we can start looking at actually using Git for version control. In what follows, we will use writing and collaborating on a LaTeX paper as an example project...
Creating a repository
First of all we need to start our paper by creating a repository.
Decide where you would like your paper to be stored and cd to that directory. Once there, create a new directory for the paper:
% mkdir dummy_paper
% cd dummy_paper
Now initialise your empty repository by typing:
% git init
To check everything has been successful type:
% ls -a
and you should see the directory .git. This special folder is where Git will store and manage the version control history of your project.
Warning
Unless you are familiar with Git it is generally best to avoid touching the .git folder or it’s contents.
Adding files
Now we have our fresh Git repository. The next step is to start adding files!
Use your editor of choice to start a LaTeX file named paper.tex in your project directory (dummy_paper). Add the following to your file and save your changes:
\documentclass{article}

\title{A dummy paper}

\begin{document}
\maketitle

\section{Introduction}
A long time ago in a galaxy far, far away...

\end{document}
Now let’s check the status of our repository using the following command:
% git status
You should see something similar to the following:
# On branch master
#
# Initial commit
#
# Untracked files:
#   (use "git add <file>..." to include in what will be committed)
#
#   paper.tex
nothing added to commit but untracked files present (use "git add" to track)
This tells us that paper.tex currently falls under the category of “untracked” files. In other words, Git is not tracking any changes we make to this file.
In order to tell Git to start tracking our new file, use the following command:
% git add paper.tex
Committing changes
At this point, if you type again:
% git status
you should see something like the following:
# On branch master
#
# Initial commit
#
# Changes to be committed:
#   (use "git rm --cached <file>..." to unstage)
#
#   new file:   paper.tex
#
This tells us that we have changes to our repository (here the creation of a new file called paper.tex) that need to be “committed”.
Committing changes to the repository is the key step of version control. This is where we save a snapshot of the current state of all tracked files. To commit our current changes type:
% git commit
This will bring up your favorite editor to allow you to provide a “commit message”. On the first line of the file write the following commit message:
Add basic structure of paper.tex
then save and exit.
That’s it! We have now created a repository, added our first file and committed our changes.
Tip
Writing good commit messages will make your life much easier in future when trying to track down particular changes. The first line should be a short (i.e. less than 80 characters), descriptive message that makes it clear what the relevant changes being committed are. If more detail is required then leave a blank line and add a longer more descriptive message there.
Also note that the norm is to use the future tense in a commit message. i.e. if you were to apply the changes in the commit, the message would say what would happen...
Staging modified files
Add another section to paper.tex with the following:
\section{A New Hope}
That's no moon, that's a battle station.
If you now run git status, you should see the following:
# On branch master
# Changes not staged for commit:
#   (use "git add <file>..." to update what will be committed)
#   (use "git checkout -- <file>..." to discard changes in working directory)
#
#   modified:   paper.tex
#
no changes added to commit (use "git add" and/or "git commit -a")
What Git now tells us is that paper.tex falls under the category of “Changes not staged for commit”. This means the file has changed since the last commit, however, we haven’t told Git that we want to include these new changes in our next commit. To do that, we must “stage” the file using git add again:
% git add paper.tex
A final check with git status should show that paper.tex now falls under the category of “Changes to be committed”.
Exercise 1a
Add another file to your git repository called appendix.tex. You can put whatever you want in here (or just leave it empty), but don’t forget to add it to your repository.
Go ahead and commit your staged changes to both paper.tex and appendix.tex.
Dealing with mistakes
Perhaps you make a typo in your commit message, or maybe you forget to stage an important change before committing. In this case you can easily amend your last commit using the git commit --amend command.
Let’s imagine that we forgot to add the file bibliography.tex to our repository when we made our last commit. To fix this, first create the file and then stage it into the index. Finally, run git commit --amend:
% touch bibliography.tex
% git add bibliography.tex
% git commit --amend
You will then be given the opportunity to change the last commit message if you want to.
Deleting and moving files
To delete a file in your repository use the git rm command. This will both delete the file from the file system and stage this deletion action for your next commit.
Alternatively, you can tell Git to remove a file from the repository (stop tracking the file) without actually deleting it from the file system. This is achieved by passing the --cached flag to the rm command (i.e. git rm --cached <filename>).
Exercise 1b
Remove the bibliography.tex file you added in Exercise 1a using the git rm <file> command. Remember to commit afterwards!
To move or rename a file, use the git mv command. This will again both move the file and stage this change to the repository.
The circle of life
At this point we have covered the basic “life cycle” of files and changes in Git. Each file can have one of four different states:
- Untracked: It’s not listed in the last commit
- Unmodified: It hasn’t changed since the last commit
- Modified: It has changed since the last commit
- Staged: The changes will be recorded in the next commit made
The method with which we move each file from one state to another is outlined in the following diagram:
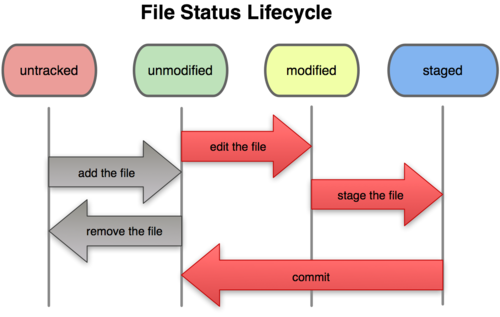
Credit: The Pro Git book.
Command summary
| Command | Description |
|---|---|
| git init | Initialise a new Git repository. |
| git status | Check the current status of a repository. |
| git add | Stage new and modified files. |
| git commit | Commit staged changes. |
| git commit --amend | Amend the last commit |
| git rm | Delete a file and stage this change. |
| git mv | Move a file and stage this change. |